How to Test a Motorcycle Battery
Testing your battery is important when it comes to a motorcycle maintenance. Here's how you can do it with a very little effort.
Many people, particularly when they’re still on the younger side of life, will end up purchasing a motorcycle. Sometimes it’s for the sake of convenience and other times for some extra “cool” points (because there’s no doubt that no matter what the model and make, there’s something undeniably cool about soaring across the highway astride your trusty motorcycle).
Of course, we’re not here to debate whether or not a motorcycle truly is a better investment than a regular automobile. Rather, we feel the need to emphasize the fact that, despite their smaller size and fewer number of different parts, motorcycles still require just as much maintenance as any automobile. In fact, you may find yourself caring for your iron horse even more so than you would your steel carriage. (We really hope that metaphor translates as well as we think it does).
A lot goes into maintaining a motorcycle. In addition to the regular clean-up you will need to perform, there are certain other checks that are just as crucial in ensuring that not only does your motorcycle live a long life, but also that it maintains that “fresh off the showroom floor” quality that makes many of the finest motorcycles the envy of the town.
You’ve no doubt read the title. Indeed, we’re going to take you through a few different methods of testing your motorcycle’s battery. Trust us, you don’t want to shirk this duty - there’s nothing worse than having your battery fail on you mid-ride and ruining your fun. So let’s take a look - grab your helmets, and now put them aside because we’re not going to be riding our motorcycles yet.
General Safety Measures
While the chances of you encountering a life-threatening situation while testing your motorcycle’s battery may seem low, the risks are still very high, and it’s never good to try your luck when you can avoid doing so. To this end, we’ve compiled a list of basic safety measures and precautions to take into account whenever you go to work on your motorcycle, battery or not.
- Know your motorcycle - that means becoming thoroughly acquainted with the user manual and the details of your specific model.
- Always work in a well-ventilated area in the event of smoke.
- Always wear protective eyewear to keep your peepers in good condition. (Sunglasses do not count as protective eyewear - there will be time to be cool later).
- Always wear latex/rubber gloves.
- Specifically, with regards to your motorcycle’s battery, keep any open flames well away from it. If you’re a smoker, that means waiting until the job is done before you light one up.
Equipment
Now that you know what not to do let’s take a look at some of the items you’ll need when inspecting your motorcycle’s battery. Luckily, this list is not nearly as long as the previous one.
- An assortment of hand-tools (to remove any panels you come across)
- Safety goggles (obviously)
- Gloves
- A digital voltmeter with a DC scale and which is able to measure volts in tenths
That last bit of equipment may be difficult to come across. And if you’re new to maintaining and inspecting your vehicle, you may not even have any idea of what on earth a digital voltmeter is.
In reality, they’re not as uncommon as you may think. Most hardware stores should stock them - just ask one of the employees to help you!
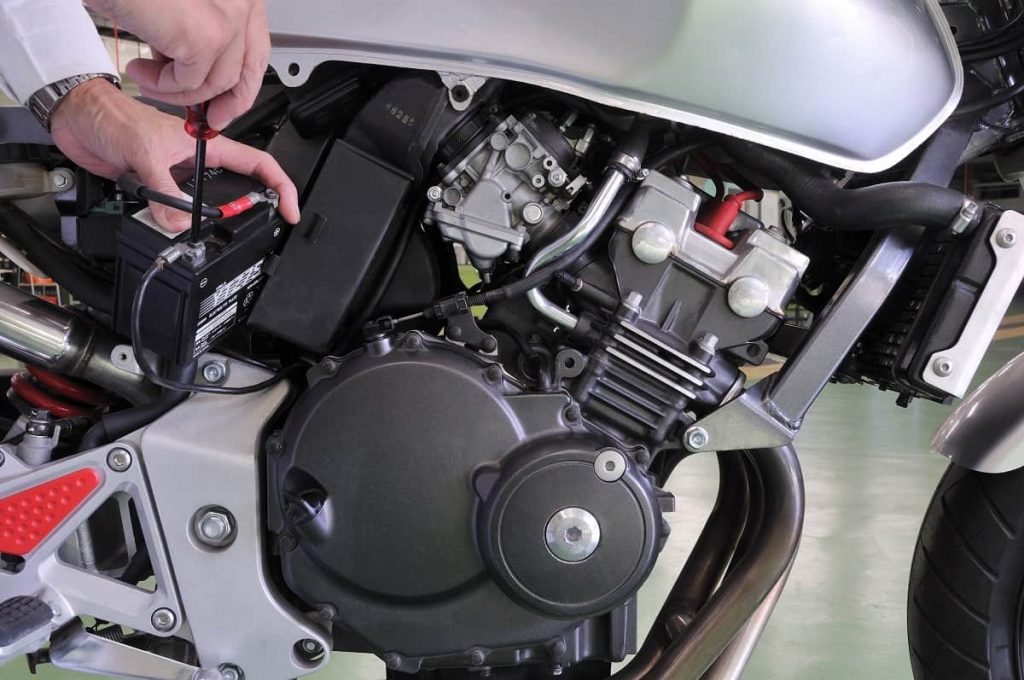
Inspecting the Battery
The first “test” you can run requires very little on your part. The simplest way to determine whether or not a battery is faulty is to inspect it, no fiddling required (yet).
Start by checking the casing. Any cracks, splits, or bulges (for lack of a better term) are all indications of damage, and while the battery is unlikely to fail outright, it should still be deemed unsafe for use until these imperfections can be ironed out. (In other news, don’t bring an iron anywhere near your motorcycle battery).
In addition to the casing, you’ll also need to be on the lookout for broken or loose terminals. These are seriously dangerous if they go undetected, and in extreme cases, can even cause the entire battery to explode.
Lastly, if your battery makes use of wet-cells, make sure that they are constantly refilled with distilled water. If they go dry, the plates in the cells will be exposed to sulfation, which is the number one cause of early battery failure.
Additionally, if you try to charge a dry battery, it’ll burn up, which again can cause it to explode. Even if the wet-cells have been refilled, be sure to check the cells themselves for any brownish tinting. This will probably mean they’ll have to be replaced before you can take your motorcycle for a spin again.
Load-Testing Your Battery
To ensure that your battery doesn’t fail you when you need it most, you should perform a load test. For this, you’ll need that voltmeter we mentioned earlier.
In essence, all you’ll be doing is reading the numbers off of the voltmeter. To do this, follow these steps:
- Work in a well-ventilated, well-lit area.
- Put the transmission into neutral and make sure the motorcycle is stable.
- Set your voltmeter to DC scale (which ranges from 0 to 24).
- Attach the positive meter lead to the positive battery terminal, then the same for the negatives.
- Read the voltage after starting up your motorcycle.
Keep in mind that the battery voltage will drop just after being started up. However, if it drops down to 9.5 VDC or lower and stays there, it doesn’t have enough charge and needs to be replaced before using it again.
Conclusion
Hopefully, our guide has been easy to follow. Testing your battery is not the most difficult task when it comes to motorcycle maintenance, but it is important. Keep this guide handy if you ever get stuck. And remember to drive safely - no point in looking cool if you’re dead, right?

WRITTEN BY
Garrett
I grew up working on my own cars and motorcycles and 15 years later I love still getting my hands dirty.